

Tutorials
Water colour tutorial. Painting in 3 easy steps

Jul
Hello, and welcome to my first watercolour tutorial blog post! I will be showing you a behind the scenes and step by step look at how I create my watercolour paintings in 3 easy steps. Over the years I have undoubtedly developed my own unique way of painting watercolours, so by all means take what you want from this post & add your own methods as you prefer!
Watercolour Tutorial step-by-step.
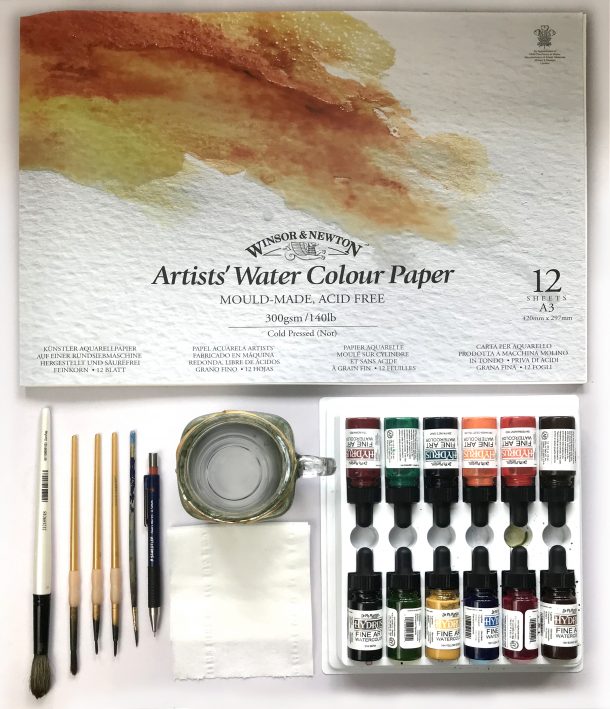
1. What You Will Need
I would like to start by showing you what you will need to get started. You will need watercolour paper, I use a couple of brands, in this case I am using Windsor & Newton. I also use Bockingford from time to time. A selection of brushes – I recommend quite a large brush for mixing the inks with water and painting the base washes. Then a selection of medium and small paintbrushes for finer detailing. I use a mechanical pencil for my initial sketches before beginning the paint work. For the watercolour I use Dr. Ph. Martin’s Fine Art Watercolour Ink, which is then mixed with water to create various strengths of colour. Then you will need your water, a mixing palette and finally a piece of tissue for dabbing excess water off your brushes.
2. The Painting Process
Once you have gathered all the necessary tools you can begin your artwork sketch, or if you prefer, start painting loose and free directly onto the watercolour paper. I personally like to sketch first especially for more detailed subjects like animals and very intricate foliage. When you are happy with your sketch, you can begin mixing the colours that you need. Don’t worry if you don’t get this right, it’s a creative process and you can always change and add extra colours later.
Start with a larger brush and pick out the lightest colours from what you are painting. Always build the watercolour from lightest to darkest tones. Once the pale base wash is down, start spotting in the next darkest tone to start creating depth and shadow. If there is a lot of black in the image start with a very washed out grey and add in the darker black into those areas while still wet to get that beautiful bleed effect.
3. Adding Detail
Once you have gone back and added in the medium tones, you can start mixing the deepest tones to paint in the finer details – in this case the feather textures. A tip would be to use a brush with a fine point, some tiny brushed look better for the job but don’t carry much water and can prove quite difficult to paint with. Have a go with both and see what you prefer. There are no right or wrongs, whatever works for you is the way I like to think of art!
And finally… the final piece, complete with all the layers of washes and detailing. Sometimes I leave the detail layer off if I am going for extra painterly, but for these I wanted to show the texture of the feathers and depth that they give. I hope this has been useful, and if nothing else, a little snapshot into the workings fo a watercolour painting in the Avalana studio.

Look out for more Watercolour Tutorials.